Positron Notebook Editor
The Positron Notebook Editor is the default editor for Jupyter (.ipynb) files. We are actively working on improving the notebook experience in Positron and want to hear from you! Share your thoughts on this Github discussion or schedule a call with our product and engineering team.
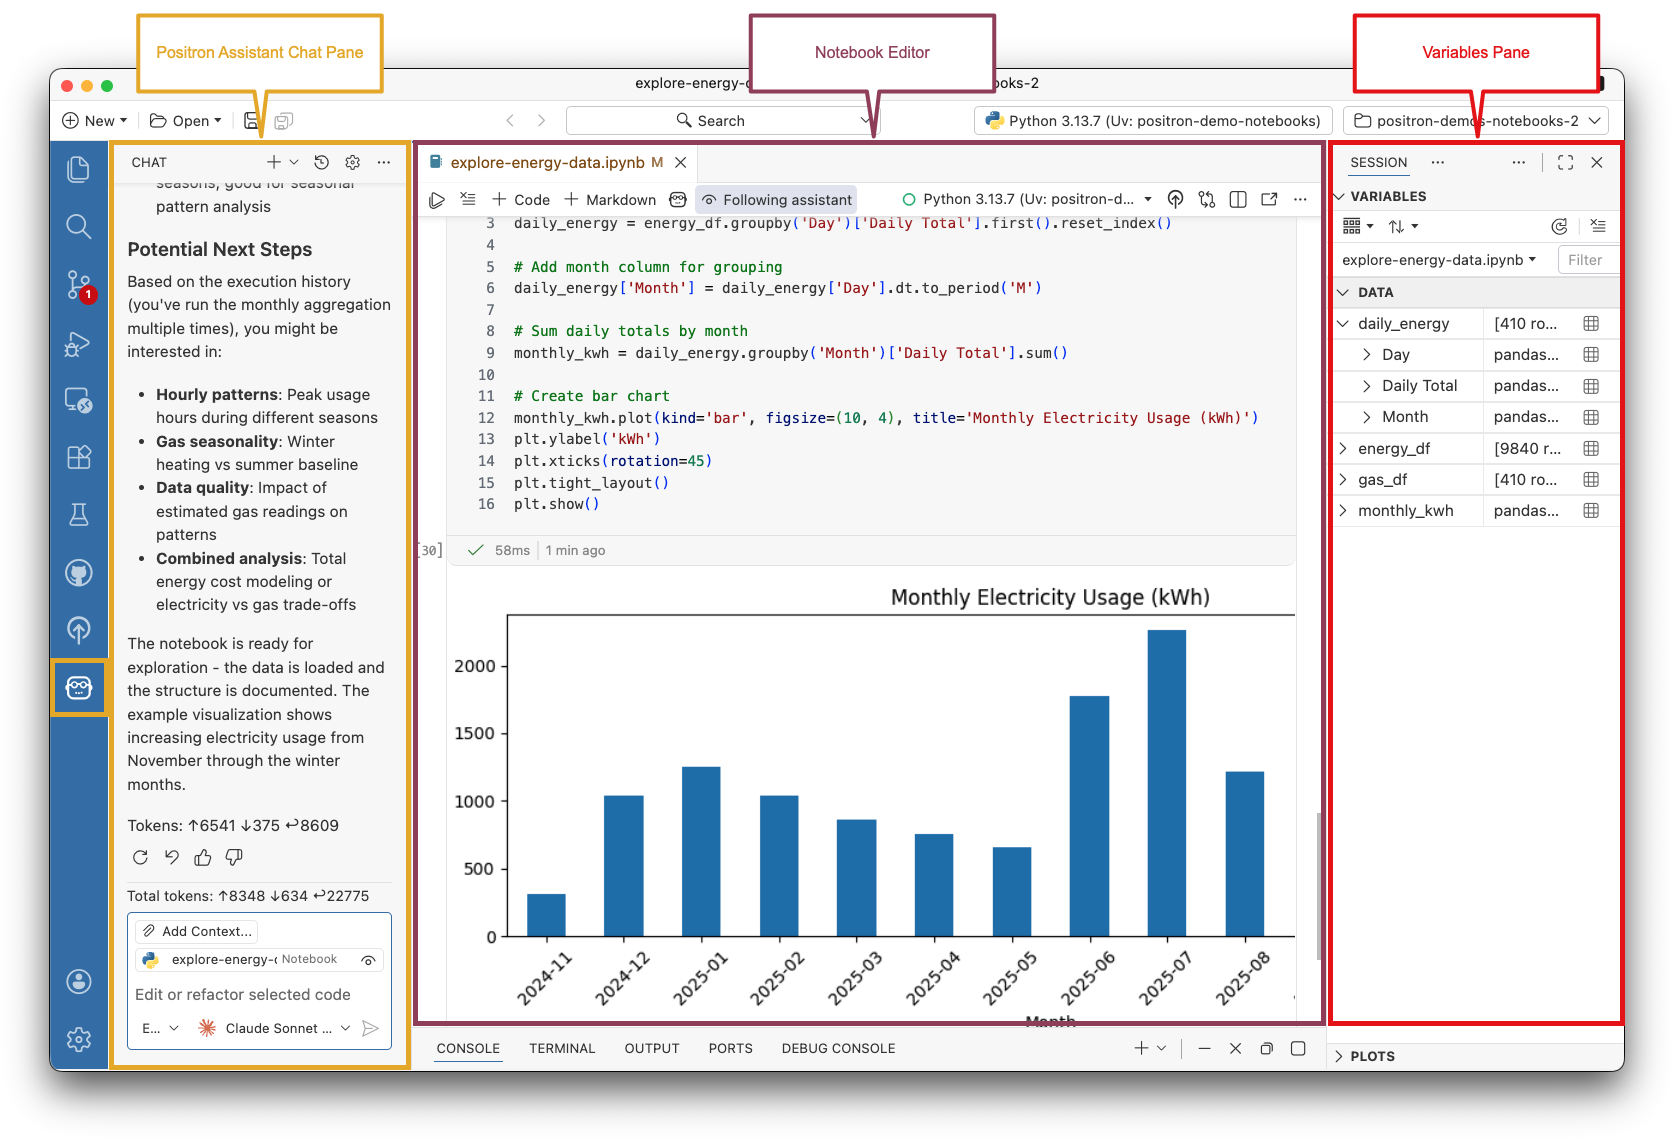
The Positron Notebook Editor provides a familiar notebook experience for Jupyter (.ipynb) files. IDE features work out of the box in notebooks, including AI assistance, data exploration, and debugging.
Key features
- Batteries-included experience: No extensions required for core features
- Improved user experience: Optimized for data science workflows
- Notebook-aware AI assistance: AI understands your notebook context, execution history, and execution order
- Integrated data exploration: Variables pane and Data Explorer work seamlessly
- Debugging: Works out of the box without additional setup
- Improved version control: Control what metadata is saved for better diffing and version control
Use the Positron Notebook Editor
The Positron Notebook Editor is the default editor for Jupyter Notebooks, so your .ipynb files open in it automatically. If you prefer the Legacy Notebook Editor, disable the positron.notebook.enabled setting, and .ipynb files will open in the Legacy Notebook Editor instead.
Getting started
You can create and edit .ipynb files in Positron just as you would in other editors. To learn how to use the Positron Notebook Editor, check out our demo notebook.
Notebook layout
For the best experience, open the Command Palette with and run the View: Notebook Layout command. This layout arranges the IDE panes into a notebook-friendly setup, giving you quick access to your variables, plots, and other data science tools alongside your notebook.
To learn more about customizing the Positron interface, read the Layout documentation.
Setting up your environment
Positron comes bundled with Jupyter kernel support for R and Python. Once you have configured a Python or R environment for Positron, you do not need to install any additional dependencies into your environment before using a notebook.
If an environment installed on your computer is not available in Positron, you might want to read more about how Positron discovers Python installations and R installations.
Selecting a notebook kernel
When you first open a Jupyter Notebook, Positron starts a notebook session and automatically selects an interpreter based on the notebook’s language, the current workspace, and your configuration. The interpreter used by the notebook is visible in the Kernel Selector in the notebook editor action bar.
Each notebook session belongs to one notebook editor. Closing the notebook editor shuts down the session.
When a notebook session is active, the Interpreter picker shows the notebook filename. This signals that a notebook, not a console, is currently active. To see the runtime backing the notebook, check the Kernel Selector in the notebook editor action bar.
You can select a different interpreter for the notebook by selecting the Kernel Selector in the notebook editor action bar. The Change Kernel… option will display a list of all the registered interpreters. Select an interpreter from the list.
Alternatively, you can run the Positron Notebook: Change Kernel… command from the Command Palette.
When a notebook is the active editor, the Interpreter picker also offers a Change Notebook Session… action that opens the same kernel-selection list.
You can restart the notebook session at any time by selecting the icon in the notebook editor action bar.
Version control
The Positron Notebook Editor controls what metadata is saved to the notebook file. This makes notebooks more version-control-friendly. By default, cell outputs are saved but execution counts are not. You can adjust this behavior with the Saving settings below.
AI integration
The Positron Notebook Editor integrates with Posit Assistant to provide notebook-aware AI assistance:
- Context-aware: Assistant has access to rich context about your notebook, including cell states, execution history, code, and outputs including images and tables.
- Dynamic Suggestions: Assistant follows your work and dynamically suggests actions to improve your notebook.
- Actionable Editing: With your permission, Assistant can directly edit and run cells in your notebook.
- Transparent: You can inspect and control the specific context the Assistant is using.
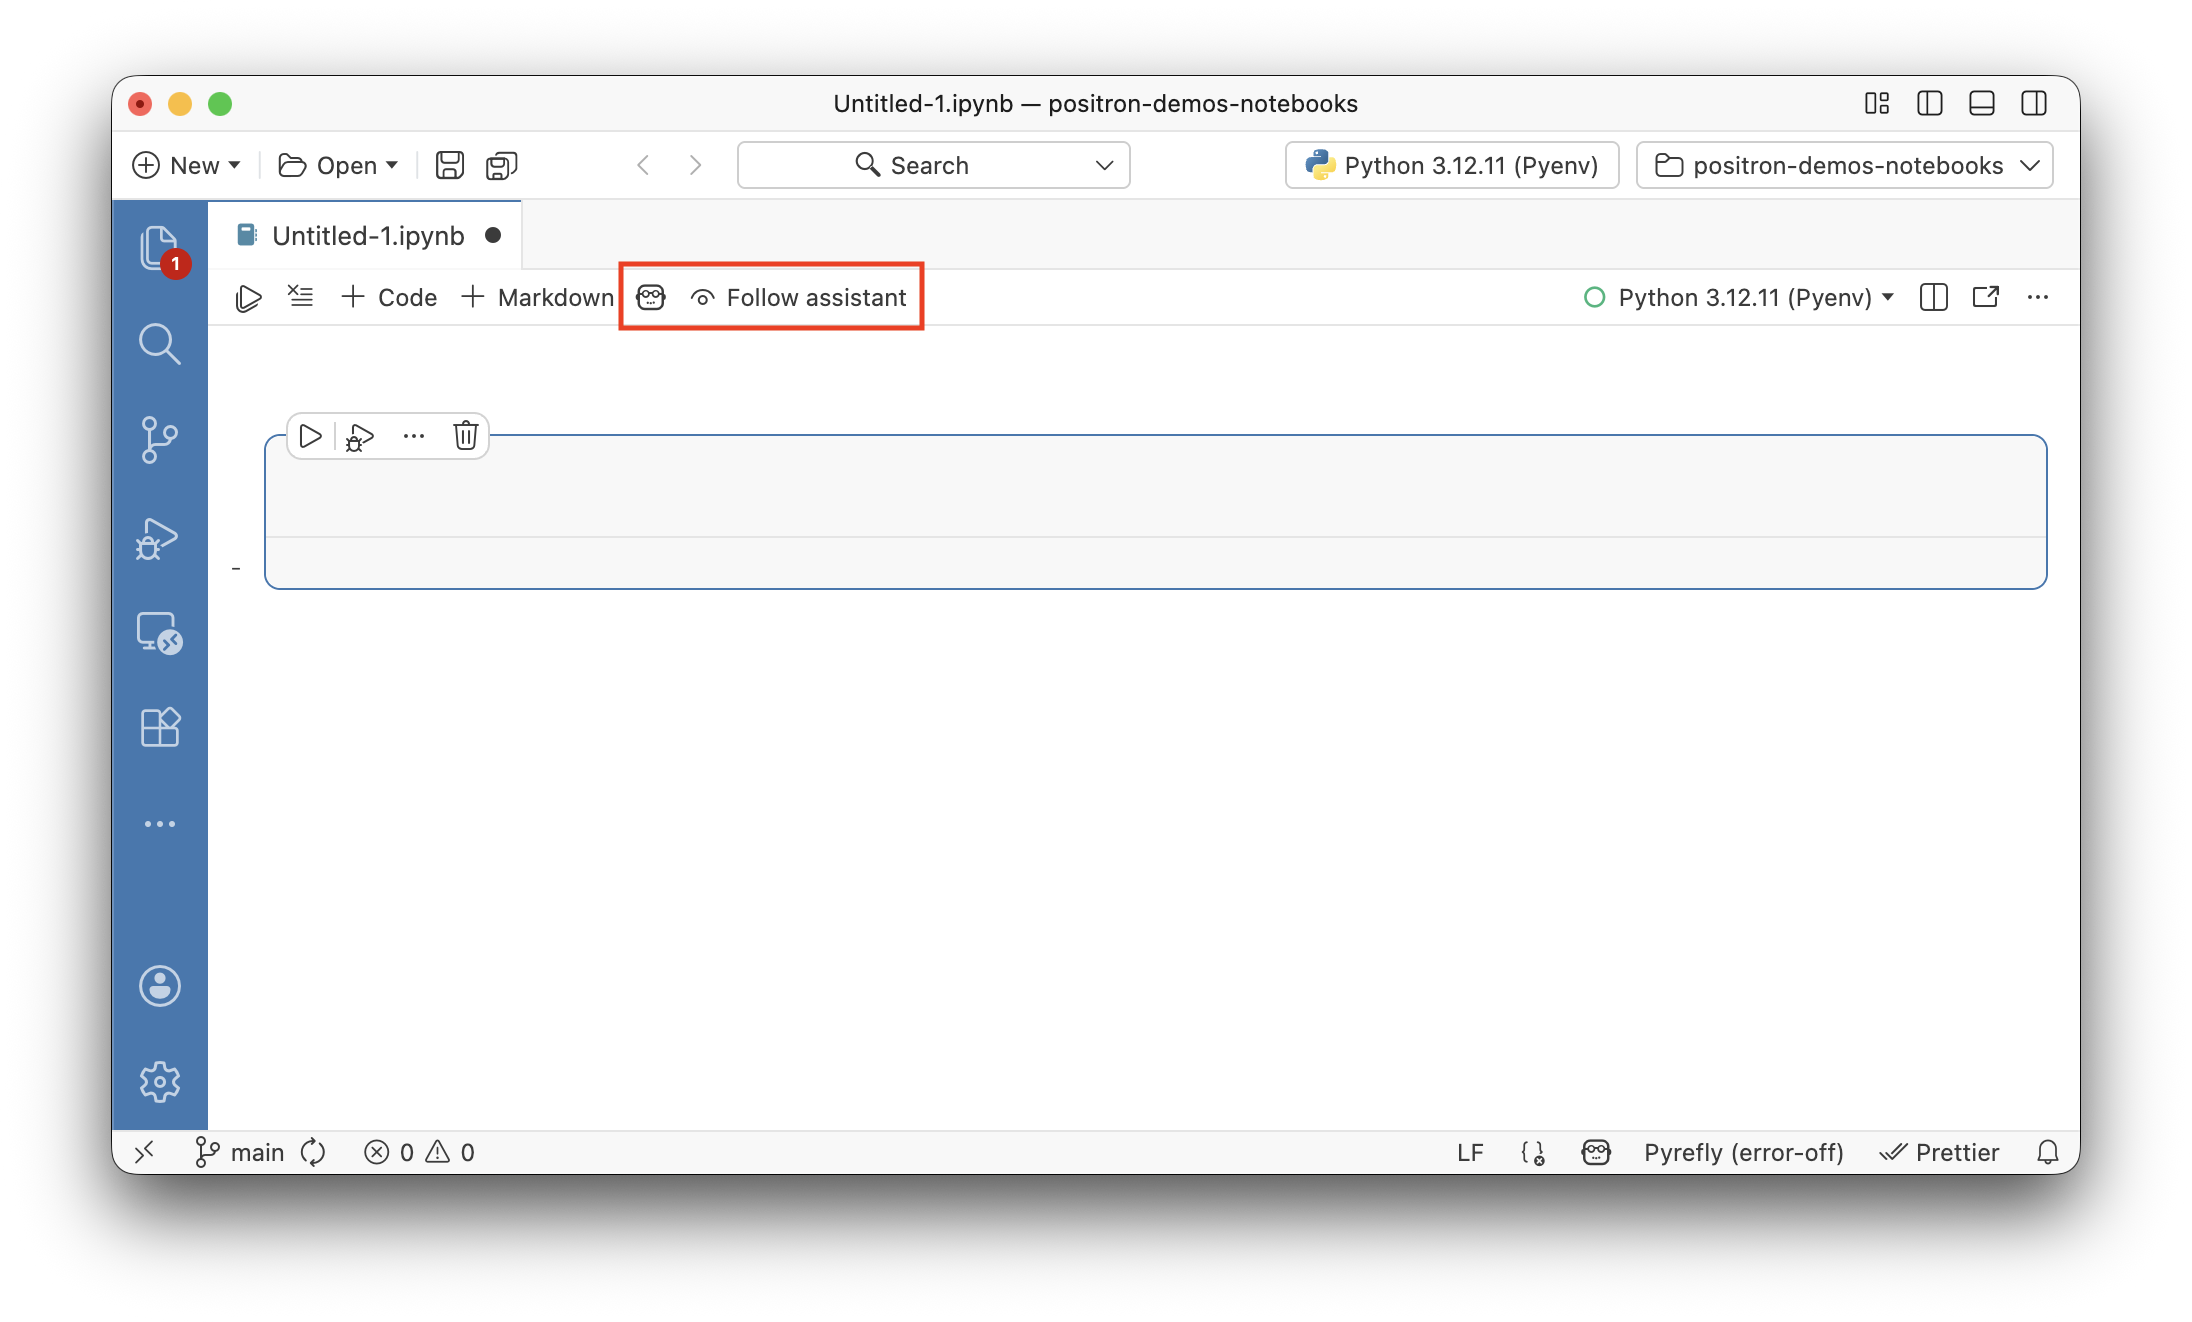
- Collaborative: Use Follow Assistant to automatically scroll and highlight cells as they are edited.
Enable Posit Assistant
To use the integrated notebook AI features, set up Posit Assistant. See the Assistant Getting Started guide for setup instructions. We recommend using Anthropic as a model provider for the best experience.
Once enabled, you will see assistant specific actions in the notebook editor action bar.
Notebook Assistant panel
The Notebook Assistant panel provides a quick way to interact with Assistant directly from your notebook. To open it, select the Assistant icon button in the notebook editor action bar.
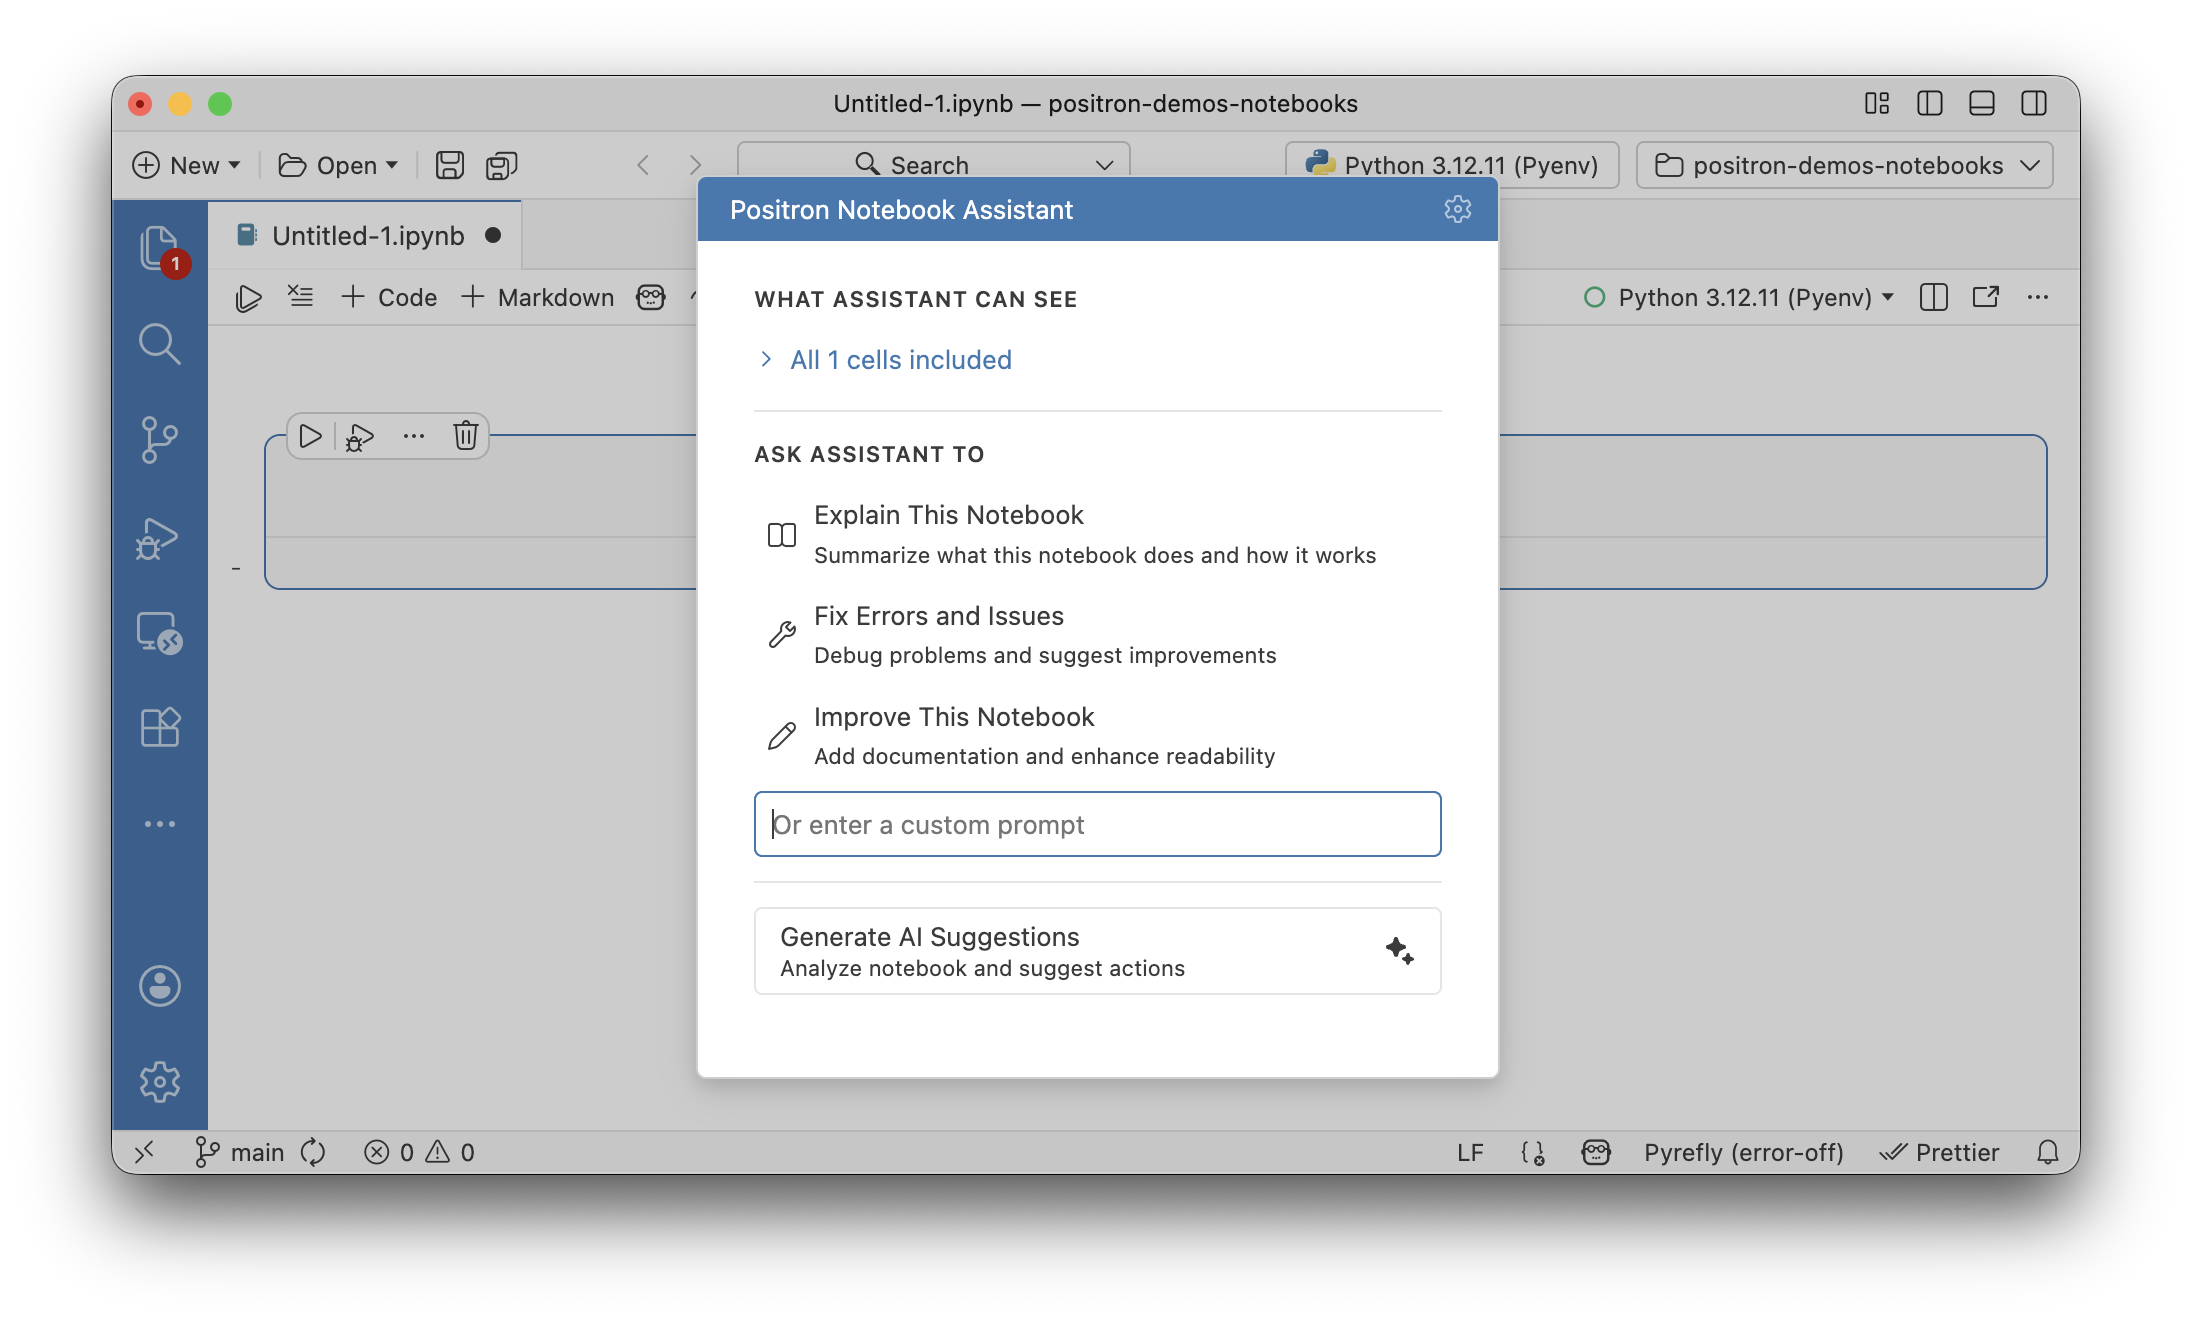
From the panel, you can:
- View context: See which cells are included in the Assistant context
- Quick actions: Run common actions like explaining the contents of a notebook or fixing errors in a notebook
- Generate suggestions: View dynamically generated suggestions based on the current state of the notebook
Selecting an option from the panel will open a new Chat pane with the notebook context already attached.
Ghost cell suggestions (experimental)
Ghost cell suggestions use AI to predict your next step after you execute a cell. A ghost cell appears below the current cell with a suggested action you can accept, edit, or dismiss.
To enable ghost cell suggestions, set positron.assistant.notebook.ghostCellSuggestions.enabled to true. By default, suggestions appear automatically after cell execution. To trigger suggestions yourself, disable positron.assistant.notebook.ghostCellSuggestions.automatic and click Get Suggestion or press .
Follow assistant
When the Assistant is actively editing cells in your notebook, you may want to watch its progress. Select Follow Assistant in the notebook editor action bar to have the notebook automatically scroll to cells as they are edited. This lets you review changes in real-time.
Customization & settings
General
positron.notebook.enabled: Use the Positron Notebook Editor as the default editor for.ipynbfiles. Enabled by default.positron.notebook.experimental: Enable experimental Positron Notebook features. Experimental features might change or be removed in future releases.- To set the default working directory for a notebook, use the
notebook.workingDirectorysetting.
Saving
notebook.save.outputs: Save outputs to the notebook file. Enabled by default.notebook.save.executionCounts: Save execution counts to the notebook file for version-control-friendly notebooks.
Inline Data Explorer
positron.notebook.inlineDataExplorer.enabled: Display data frames inline as interactive data grids. Enabled by default.positron.notebook.inlineDataExplorer.maxHeight: Set the maximum height in pixels for inline data explorers in notebook and Quarto outputs. Default to 300 pixels.
Assistant
notebook.ai.enabled: Enable or disable all AI features in the Notebook Editor, including ghost cell suggestions, the Notebook Assistant panel, Visualize, and cell Fix & Explain actions. Enabled by default. Note: notebook AI features are active only when bothnotebook.ai.enabledandai.enabledaretrue.positron.assistant.notebook.suggestions.model: Set the model used when generating AI suggestions in notebooks.positron.assistant.notebook.deletionSentinel.show: Show deletion sentinels when cells are deleted. When disabled, cells are deleted immediately without undo placeholders. Enabled by default.positron.assistant.notebook.deletionSentinel.timeout: Time in milliseconds before deletion sentinels auto-dismiss (0 to disable auto-dismiss).positron.assistant.notebook.showDiff: Show a diff view for AI assistant edits to notebook cells. When disabled, the assistant applies changes directly without requiring approval. Enabled by default.
Ghost cell suggestions (experimental)
positron.assistant.notebook.ghostCellSuggestions.enabled: Show AI-generated suggestions for the next cell after successful cell execution. A ghost cell with a suggested next step will appear after a brief delay.positron.assistant.notebook.ghostCellSuggestions.automatic: When enabled, suggestions appear automatically after cell execution. When disabled, a placeholder appears and you can request a suggestion by clicking Get Suggestion or pressing .positron.assistant.notebook.ghostCellSuggestions.delay: Time in milliseconds to wait after cell execution before showing ghost cell suggestions.positron.assistant.notebook.ghostCellSuggestions.maxVariables: Maximum number of session variables to include in ghost cell suggestion context. Variables are prioritized by relevance (DataFrames and tables first, then collections and scalars). Set to 0 to disable variable context.positron.assistant.notebook.ghostCellSuggestions.model: Model patterns for ghost cell suggestions. Patterns are tried in order until a match is found (case-insensitive partial matching). Falls back to the current chat session model, then the provider’s model, then the first available model.